Friday, 27 September 2019

How about Digiprog 3 for Fiat odometer correction

Look here: 
Digiprog 3 Fiat vehicle coverage:

Fiat 500
Fiat 500 Tacho 95080/ECU 95320
Fiat Brava ST Cluster-Diagnosis
Fiat Bravo -2007
Fiat Bravo 2005-2007
Fiat Bravo MM08 Programming Via Micro
Fiat Bravo NS56 Programming Via Micro
Fiat Croma -2007
Fiat Croma 2005-2007
Fiat Daily VDO
Fiat Doblo -2006
Fiat Doblo -2007
Fiat Doblo EDC16 95640
Fiat Ducato
Fiat Ducato -2007
Fiat Ducato 2.8jtd
Fiat Ducato M2002 NEC
Fiat Duplo Model 2002
Fiat Fiorino 95080/ECU95320 Ducato/Punto 95160
Fiat Idea -2007
Fiat Idea -2007
Fiat Iveco Daily
Fiat Marea 2004
Fiat Marea 2004 Programming via Micro
Fiat Marea HC11 Programming Via Micro
Fiat Multipla
Fiat Multipla Cluster-Diagnosis
Fiat Multipla M2002 C56
Fiat Panda
Fiat Panda -2007
Fiat Panda -2007
Fiat Panda Chip 95040 Program via chip
Fiat Punto -2007
Fiat Punto 200-2006
Fiat Punto 2002 NEC
Fiat Punto Jeager 08 Cluster-Diagnosis
Fiat Punto/Doblo 95040
Fiat Scudo
Fiat Scudo Tacho und Box
Fiat Scudo bsi 95128
Fiat Scudo dash 95020
Fiat Sedici
Fiat Seicento
Fiat Stilo
Fiat Stilo Programming Via Micro
Fiat Ulysee 2004 Programming Via Tacho & BSI
Fiat Ulysse Programming Via Micro

Test: Digiprog 3 changed km for Fiat Stilo HCS12

wiring diagram on the fiat dashboard
digiprog-3-fiat-change-km-1

plug st48 in use
digiprog-3-fiat-change-km-2

run digiprog 3 car diagnostic tester
digiprog-3-fiat-change-km-3

digiprog 3 main menu:
car/truck - fiat - stilo - hcs12

digiprog-3-fiat-change-km-5

digiprog-3-fiat-change-km-6

digiprog-3-fiat-change-km-7

digiprog-3-fiat-change-km-8

confirm the plug 48
digiprog-3-fiat-change-km-9

the old km: 117102 km
digiprog-3-fiat-change-km-10

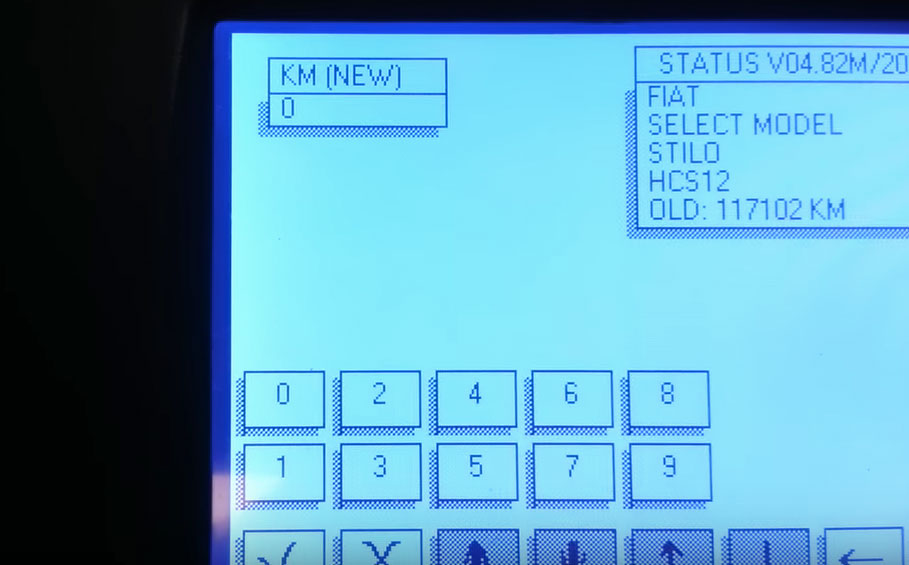
enter a new km: 86123 km
digiprog-3-fiat-change-km-11

digiprog-3-fiat-change-km-12

km is changed
go to read the new km and confirm if it’s successful or not
digiprog-3-fiat-change-km-13

digiprog-3-fiat-change-km-14

digiprog-3-fiat-change-km-15

digiprog-3-fiat-change-km-16

digiprog-3-fiat-change-km-17


digiprog 3 shows the old km: 86123 km
it is the km written with dp3 just now

result: digiprog 3 changed fiat km without issues!

Monday, 5 August 2019

How to solve Yanhua YH35XX Programmer messed code and unrecognized error?

I received the Yanhua YH35XX Programmer with Simulator but when I try to connect it says no programmer found, and got messed code shown as below, I want to read write 35128WT.

yanhua-yh35xx-programmer-no-programmer-found-01

yanhua-yh35xx-programmer-no-programmer-found-02

The solution offered by Yanhua Engineer
https://mega.nz/#!JIg02agK!Ev3uZfmyImJAJ0-UEC5MLmPCElJoDjd5CWX-PJzqkfg
Tested OK by obd2shop.co.uk engineer and real users.

1. Insert the programmer into the computer and the computer recognizes a U disk named 35XX programmer.
yanhua-yh35xx-programmer-no-programmer-found-03


2. Open the U disk, find the executable with the BMW_ODO_Professional_edition.exe or BMW_ODO_Standard_edition.exe name, and double-click to run
3. Wait a few seconds after the program runs, and read and write the chip when the status bar at the bottom of the application says, "programmer connection successful."

Tip: If the program runs incorrectly, or the program show you for a missing Microsoft .NET Framework4.6 runtime, Please download and install the Microsoft .NET runtime, and then restart the program.
Refer to the download connection below, copy it to your computer browser and open it:
https://www.microsoft.com/zh-cn/download/details.aspx?id=48130 

http://blog.obd2shop.co.uk/how-to-solve-yanhua-yh35xx-programmer-messed-code-and-unrecognized-error/


Monday, 15 July 2019

How to use Yanhua YH35XX Programmer + Simulator

Yanhua YH35XX Programmer & Simulator can be used for reading and writing 35128WT. This post will guide you on how to use it.

Here comes the procedure:

1. Dismantle the original 35XX EEPROM from the odometer and solder it to the adaptor board. Then clamp the adaptor board with the solder-free clamp. Make sure the direction of the adaptor board and the solder-free clamp is correct.

how-to-use-yanhua-yh35xx-programmer-simulator-01

how-to-use-yanhua-yh35xx-programmer-simulator-02

how-to-use-yanhua-yh35xx-programmer-simulator-03
2. Plug the YH35XX programmer into the USB port of the PC, Click "computer" and it will recognize a USB flash drive named 35XX programmer.
how-to-use-yanhua-yh35xx-programmer-simulator-05
3. Click U disk35XXprogrammer, Double-click "BMW_ODO_Standard_edition. exe" to open the software.

how-to-use-yanhua-yh35xx-programmer-simulator-06
4. Wait for the prompt: Programmer connection successful, Then run it.
how-to-use-yanhua-yh35xx-programmer-simulator-07

5. Select the EEPROM model and click "Read DATA+ID", check whether the read mileage is the same as the actual mileage.
how-to-use-yanhua-yh35xx-programmer-simulator-08

6. Click "Save Data File", Save the original data of original EEPROM to the folder.

how-to-use-yanhua-yh35xx-programmer-simulator-09

7. Hold the handle of the simulator, Clamp the Simulator with the solder-free clamp. Pay attention to the direction. Then connect the solder-free clamp to the programmer, connect the programmer to the PC.

how-to-use-yanhua-yh35xx-programmer-simulator-10

how-to-use-yanhua-yh35xx-programmer-simulator-11

how-to-use-yanhua-yh35xx-programmer-simulator-12

8. Select the EEPROM model, click "Load Data File", Select the corresponding data of original EEPROM and load it. Check whether the displayed mileage is the same as the mileage displayed in odometer.

how-to-use-yanhua-yh35xx-programmer-simulator-13

how-to-use-yanhua-yh35xx-programmer-simulator-14

9. Once the mileage is confirmed, click "Write DATA+ID", Write the original data into the Simulator.
how-to-use-yanhua-yh35xx-programmer-simulator-15

10. Click "Read Data+ID", read the data written into the Simulator, and check the mileage.


how-to-use-yanhua-yh35xx-programmer-simulator-16
11. After the mileage is confirmed, click "Mileage modification" and input the mileage you want.
how-to-use-yanhua-yh35xx-programmer-simulator-17
how-to-use-yanhua-yh35xx-programmer-simulator-18
12. After confirming the input mileage is correct, click "Write DATA+ID" to write the modified data into the Simulator.
how-to-use-yanhua-yh35xx-programmer-simulator-19
13. After the data is written, click "Read DATA+ID" to check whether the mileage modification is correct.
how-to-use-yanhua-yh35xx-programmer-simulator-20
14. If the displayed mileage is the same as what you want, cut off the handle of the Simulator, and solder the Simulator to the original EEPROM position. Pay attention to the EEPROM direction. Install the odometer back to the car to verify whether the mileage modification is successful.

how-to-use-yanhua-yh35xx-programmer-simulator-21

Wednesday, 24 October 2018

How to use Yanhua 35160/35080 Programming Emulator

Yanhua 35160/35080 Programming Emulator comes with an independent program which can adjust mileage directly.

Yanhua 35160-35080 Programming Emulator


It supports the following EEPROM models:

M35080 / M35080-3 / M35080-6 / M35080V6 / M35080VP / 080DOWQ / 080DOWT / 160DOWQ / 160DOWT / 35160WT EEPROM

How to use the Programming Emulator:

1. Chip Soldering
Solder the 35XX chip on the meter to the specified location of the simulator,
pay attention to the chip direction.

2. New folder 
Add a new folder on your desktop, for example, named "mileage modification."

3. Simulator connection
Connect the emulator to the Mini USB cable, plug in the computer USB interface,
and a USB flash drive with the name (35xxx memory) on the computer "has a removable storage device" be added.

4. Decompress the modification tool
Open the (35xxx memory) U disk, copy the compressed file "35xx mileage modification tool .rar" and paste to the desktop “mileage modification” folder, and then decompress it to the current folder to get the file "35xx mileage modification tool .exe".

5. Copy the original data to the "mileage modification" folder on the desktop.
According to the original car chip model, select the corresponding original data and copy it to the“mileage modification” folder
on the desktop. (If the original car chip is 35080, choose 35080 raw data.bin; if the original car chip is 35160, choose 35160 raw data. bin)

6. Open the mileage modification tool
Open the “mileage modification” folder, drag the original data to the modification tool or double-click to open the “35XX mileage modification tool”, drag the original data into the tool interface and press Enter to confirm.

7. Modify mileage
Enter the mileage data you want to modify as prompted (Note: please enter unit after the value like XXXkm or XXXmi), then press Enter to confirm, and the new file 35xxx raw data _yyyy.bin will be automatically generated.

8. Copy the modified data to the "35XX memory" U disk
Open the "35XX Memory" USB flash drive, delete the 35xxx simulated data  .bin file of the corresponding chip (note the "simulated" data file), and then copy the 35xxx original data _yyyy.bin file generated in the "mileage modification" folder to the "35XX memory" U disk.

9. Data comparison
Re-plug the simulator, open the "35XX memory" U disk, compare the newly-generated simulated data of the corresponding chip and the modified data in the "mileage modification" folder. If the data is the same, the operation is successful. Solder the simulator to the instrument chip location.

Tip: The copied raw data.bin file is recommended to be saved to the computer so that the data can be recovered when the operation is wrong. If the operation is abnormal, don't be nervous, unplug the USB and plug it back to restore normally.


Yanhua 35160/35080 Programming Emulator Operating Video:


https://mileage-correction-tool.blogspot.com/