Friday, 17 January 2020

2015 - 2017 Mercedes_OBD mileage programming user manual

The cheapest solution to Mercedes Benz 2015-2017 mileage programming via OBD: Mercedes_OBD cable (Look at the image below).

how-to-use-mercedes-obd-01


Coverage: 
W222: 2015~2017
W205: 2015~2017
C217: 2015~2017
C190: 2015~2017
C253: 2015~2017
X253: 2015~2017
W447: 2015~2017
W213: 2015~2017 (to be upgraded) before 2015, you need to add a can filter.
how-to-use-mercedes-obd-02


How to use Mercedes_OBD for 2015-2017 Mercedes Benz mileage programming: 
Open the Mercedes-Benz dashboard adjustment assistant software;
The dashboard adjustment will take 30 to 60 minutes, so the vehicle must be fully charged!
Inside "Information display" , there are instructions for the entire procedure.
how-to-use-mercedes-obd-03


Click on "OBD read config information".
If it can work with the car, it will display the message "The process takes about 15-30 minutes, please makes sure the vehicle battery is sufficient!", please turn on the ignition switch first! 
how-to-use-mercedes-obd-04


If the dashboard type is not supported, it will prompt: The current dashboard is detected not 2015 - 2017 year, if it is before 2015 year, please add can filter, then click on "4. OBD read odometer value" and then "5. OBD write odometer value". If the dashboard is after 2017 year, Mercedes_OBD software can't support is yet.

Next is to use Mercedes _OBD assistant software for 2016 W205 dashboard adjustment. 
Step 1: OBD read configuration information. 

Configuration data must be saved after successful reading!

Step 2: Edit the MCU data, you need to remove the back cover of the meter, select the meter type, and select the wiring method according to the type. Directly open the wiring diagram. The meter is available with 8 drives and 11 drives, please select the correct one, there are 5 wires in total.
how-to-use-mercedes-obd-05


After connecting the wires according to the wiring diagram, perform the operation


After the MCU data is edited successfully, the wiring can be removed.
how-to-use-mercedes-obd-06

how-to-use-mercedes-obd-07

how-to-use-mercedes-obd-08


Step 3: Write the configuration information that is read out in the first step, and you can select the saved data at this time. 

Configuration information is written successfully.

At this time, you can adjust the odometer, you can read the odometer value first, and then write.
how-to-use-mercedes-obd-09

Here we have written the odometer value of 12,345
Then read it out is 12345km

Then look at the meter, the odometer value is correct! The steps are complete!

Job is done

Source of New OBD2 Mileage Correction Tool for 2015-2017 Benz:
https://www.obd2shop.co.uk/wholesale/obd2-odometer-correction-for-2015-2017-benz-mileage-correction.html

Tuesday, 7 January 2020

How to use New OBD2 Mileage Correction Tool to adjust mileage for 2016 Benz W205

This post is mainly to introduce how to use New OBD2 Mileage Correction Tool to adjust mileage for 2016 Benz W205.

It's easy to use it:

Step 1: OBD Read Configuration Information
Configuration data must be saved after successful reading!

Step 2: MCU Data Programming
At this time, you need to remove the back cover of the dashboard, select the type, and select the wiring method according to the type.
You can open the wiring diagram directly, there are 5 wires in total(as the picture). The meter is divided into 8-drive and 11 drive. Please confirm whether the meter is 8-drive or 11-drive.

new-obd2-mileage-correction-tool-for-benz

After connecting the wires according to the wiring diagram, perform the operation.
If the MCU data is edited successfully, the wiring can be removed.

Step 3: OBD Write Configuration Information
The configuration information is the data read in the first step, and you can select the saved data at this time;
Then you can get the prompt that the vehicle configuration information is written successfully

Finally, you can adjust the mileage
Use the <4 OBD Read Mileage> and <5 OBD Write Mileage> options to read and write the kilometers.
For example, we wrote the mileage of 12345; Then read it out is 12345km.

Look at the dashboard again, the kilometers are correct! The steps are complete!

Please kindly Note:
1. <1 OBD Read Config Info> and <2 OBD Write Config Info> communication takes 15-30 minutes, Please make sure the vehicle battery is sufficient!
2. Before operating <2 MCU Data Programming>, Please confirm whether the meter is 8-drive or 11-drive.

When you start step 1, the following prompt may appear:
If Odometer Correction is supported, here are the tips: Make sure the vehicle battery is sufficient.
If Odometer Correction is not supported, here are the tips: For cars before 15 years, you need to add a filter, and then you can operate steps 4 (OBD read kilometers) and steps 5 (OBD write kilometers); cars after 17 years do not support Odometer Correction temporarily. 

http://blog.obd2shop.co.uk/how-to-use-new-obd2-mileage-correction-tool-to-adjust-mileage-for-2016-benz-w205/

Wednesday, 30 October 2019

OBDSTAR ODO Master Manual: Update, Function, Vehicle Coverage

ODO Master is a new device produced by OBDSTAR, it is specialized for Odometer Adjustment, the following is an explanation of its' Manual: update, function, vehicle coverage.

OBDSTAR ODO Master Update:
1. Support One-Click Upgrade
2. The update cycle is short and fast (updated every 2-3 days)
3. Free upgrade within one year, after 1 year, it cost 300USD a year.

obdstar-odomaster-01
OBDSTAR ODO Master Functions:
1. Data Backup
2. Data Recovery
3. Read Odometer
4. Write Odometer
5. Odometer Reset
6. Oil Service Reset
7. Read & Clear DTC

obdstar-odomaster-02

ODO Master Vehicle Coverage:
ODO Master has a more wide model coverage than OBDstar x300m, some models can support 18/19 years of the car (such as GM/Chrysler)
Europe: Alfa Romeo, AUDI, Bentley, Benz, BMW/Mini, Citroen, Peugeot, Ferrari, Fiat, Jaguar, Lancia, Land Rover, Maserati, Opel, Porsche, Renault, Smart, Volvo, IVECO, SKODA, SEAT, VW
Japan: Isuzu, Mazda, Mitsubishi, Infinite, Nissan, Subaru, Suzuki, Toyota
Korea: Kia, Ssangyong
America: Ford, Lincoln, Chrysler, GM
China: Geely, Besturn, Changan, ROEWE MG, Roewe

ODO Master Toyota function list:
TOYOTA
AURIS
2013
Mileage Calibration
TOYOTA
AURIS D70F35xx
2015-2016
Mileage Calibration
TOYOTA
AVENSIS
2013
Mileage Calibration
TOYOTA
AVENSIS D70F35xx
2015-2016
Mileage Calibration
TOYOTA
CAMRY
2018
Mileage Calibration
TOYOTA
CH-R D70F35xx
 
Mileage Calibration
TOYOTA
CH-R D70F3535
 
Mileage Calibration
TOYOTA
COROLLA
2013
Mileage Calibration
TOYOTA
COROLLA D70F35xx
2015-2016
Mileage Calibration
TOYOTA
PROACE BSI04
 
Mileage Calibration
TOYOTA
TACOMA D70F35xx
2016
Mileage Calibration
TOYOTA
TACOMA D70F3535
2016
Mileage Calibration

ODO Master Audi function list:

AUDI A3 2003-2006 Mileage Calibration
AUDI A3 2007-2010 Mileage Adjustment
Error Repair
AUDI A4 RB4 2002-2005 Mileage Adjustment
Write EEPROM
AUDI A4 RB8 2006-2007 Mileage Calibration
AUDI A4L 2008-2012 Mileage Calibration
AUDI A4L 2013- Mileage Calibration
AUDI A5 2008-2012 Mileage Calibration
AUDI A5 2013- Mileage Calibration
AUDI A6 1998-2004 Mileage Calibration
AUDI A6L 2004-2008 Mileage Calibration
AUDI A6L 2009- Mileage Calibration
AUDI A8L 2003-2006 Mileage Calibration
AUDI A8L 2007-2011 Mileage Calibration
AUDI Q5 2008-2012 Mileage Calibration
AUDI Q5 2013- Mileage Calibration
AUDI Q7 2006-2008 Mileage Calibration
AUDI Q7 2009- Mileage Calibration
AUDI R8 2007- Mileage Adjustment
Error Repair
AUDI S5 2008-2012 Mileage Calibration
AUDI S5 2013- Mileage Calibration
AUDI S8 2007-2011 Mileage Calibration
AUDI TT 2007-2010 Mileage Adjustment
Error Repair

More ODOMASTER Function car list please click here:

Friday, 27 September 2019

How about Digiprog 3 for Fiat odometer correction

Look here: 
Digiprog 3 Fiat vehicle coverage:

Fiat 500
Fiat 500 Tacho 95080/ECU 95320
Fiat Brava ST Cluster-Diagnosis
Fiat Bravo -2007
Fiat Bravo 2005-2007
Fiat Bravo MM08 Programming Via Micro
Fiat Bravo NS56 Programming Via Micro
Fiat Croma -2007
Fiat Croma 2005-2007
Fiat Daily VDO
Fiat Doblo -2006
Fiat Doblo -2007
Fiat Doblo EDC16 95640
Fiat Ducato
Fiat Ducato -2007
Fiat Ducato 2.8jtd
Fiat Ducato M2002 NEC
Fiat Duplo Model 2002
Fiat Fiorino 95080/ECU95320 Ducato/Punto 95160
Fiat Idea -2007
Fiat Idea -2007
Fiat Iveco Daily
Fiat Marea 2004
Fiat Marea 2004 Programming via Micro
Fiat Marea HC11 Programming Via Micro
Fiat Multipla
Fiat Multipla Cluster-Diagnosis
Fiat Multipla M2002 C56
Fiat Panda
Fiat Panda -2007
Fiat Panda -2007
Fiat Panda Chip 95040 Program via chip
Fiat Punto -2007
Fiat Punto 200-2006
Fiat Punto 2002 NEC
Fiat Punto Jeager 08 Cluster-Diagnosis
Fiat Punto/Doblo 95040
Fiat Scudo
Fiat Scudo Tacho und Box
Fiat Scudo bsi 95128
Fiat Scudo dash 95020
Fiat Sedici
Fiat Seicento
Fiat Stilo
Fiat Stilo Programming Via Micro
Fiat Ulysee 2004 Programming Via Tacho & BSI
Fiat Ulysse Programming Via Micro

Test: Digiprog 3 changed km for Fiat Stilo HCS12

wiring diagram on the fiat dashboard
digiprog-3-fiat-change-km-1

plug st48 in use
digiprog-3-fiat-change-km-2

run digiprog 3 car diagnostic tester
digiprog-3-fiat-change-km-3

digiprog 3 main menu:
car/truck - fiat - stilo - hcs12

digiprog-3-fiat-change-km-5

digiprog-3-fiat-change-km-6

digiprog-3-fiat-change-km-7

digiprog-3-fiat-change-km-8

confirm the plug 48
digiprog-3-fiat-change-km-9

the old km: 117102 km
digiprog-3-fiat-change-km-10

enter a new km: 86123 km
digiprog-3-fiat-change-km-11

digiprog-3-fiat-change-km-12

km is changed
go to read the new km and confirm if it’s successful or not
digiprog-3-fiat-change-km-13

digiprog-3-fiat-change-km-14

digiprog-3-fiat-change-km-15

digiprog-3-fiat-change-km-16

digiprog-3-fiat-change-km-17


digiprog 3 shows the old km: 86123 km
it is the km written with dp3 just now

result: digiprog 3 changed fiat km without issues!

Monday, 5 August 2019

How to solve Yanhua YH35XX Programmer messed code and unrecognized error?

I received the Yanhua YH35XX Programmer with Simulator but when I try to connect it says no programmer found, and got messed code shown as below, I want to read write 35128WT.

yanhua-yh35xx-programmer-no-programmer-found-01

yanhua-yh35xx-programmer-no-programmer-found-02

The solution offered by Yanhua Engineer
https://mega.nz/#!JIg02agK!Ev3uZfmyImJAJ0-UEC5MLmPCElJoDjd5CWX-PJzqkfg
Tested OK by obd2shop.co.uk engineer and real users.

1. Insert the programmer into the computer and the computer recognizes a U disk named 35XX programmer.
yanhua-yh35xx-programmer-no-programmer-found-03


2. Open the U disk, find the executable with the BMW_ODO_Professional_edition.exe or BMW_ODO_Standard_edition.exe name, and double-click to run
3. Wait a few seconds after the program runs, and read and write the chip when the status bar at the bottom of the application says, "programmer connection successful."

Tip: If the program runs incorrectly, or the program show you for a missing Microsoft .NET Framework4.6 runtime, Please download and install the Microsoft .NET runtime, and then restart the program.
Refer to the download connection below, copy it to your computer browser and open it:
https://www.microsoft.com/zh-cn/download/details.aspx?id=48130 

http://blog.obd2shop.co.uk/how-to-solve-yanhua-yh35xx-programmer-messed-code-and-unrecognized-error/


Monday, 15 July 2019

How to use Yanhua YH35XX Programmer + Simulator

Yanhua YH35XX Programmer & Simulator can be used for reading and writing 35128WT. This post will guide you on how to use it.

Here comes the procedure:

1. Dismantle the original 35XX EEPROM from the odometer and solder it to the adaptor board. Then clamp the adaptor board with the solder-free clamp. Make sure the direction of the adaptor board and the solder-free clamp is correct.

how-to-use-yanhua-yh35xx-programmer-simulator-01

how-to-use-yanhua-yh35xx-programmer-simulator-02

how-to-use-yanhua-yh35xx-programmer-simulator-03
2. Plug the YH35XX programmer into the USB port of the PC, Click "computer" and it will recognize a USB flash drive named 35XX programmer.
how-to-use-yanhua-yh35xx-programmer-simulator-05
3. Click U disk35XXprogrammer, Double-click "BMW_ODO_Standard_edition. exe" to open the software.

how-to-use-yanhua-yh35xx-programmer-simulator-06
4. Wait for the prompt: Programmer connection successful, Then run it.
how-to-use-yanhua-yh35xx-programmer-simulator-07

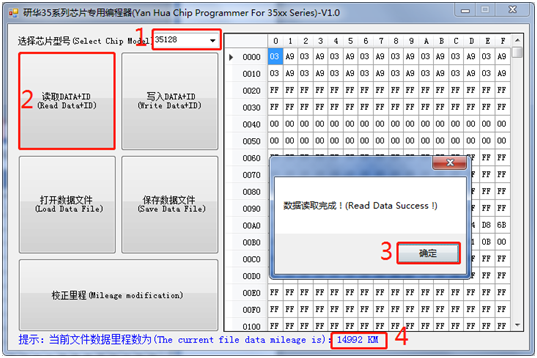
5. Select the EEPROM model and click "Read DATA+ID", check whether the read mileage is the same as the actual mileage.
how-to-use-yanhua-yh35xx-programmer-simulator-08

6. Click "Save Data File", Save the original data of original EEPROM to the folder.

how-to-use-yanhua-yh35xx-programmer-simulator-09

7. Hold the handle of the simulator, Clamp the Simulator with the solder-free clamp. Pay attention to the direction. Then connect the solder-free clamp to the programmer, connect the programmer to the PC.

how-to-use-yanhua-yh35xx-programmer-simulator-10

how-to-use-yanhua-yh35xx-programmer-simulator-11

how-to-use-yanhua-yh35xx-programmer-simulator-12

8. Select the EEPROM model, click "Load Data File", Select the corresponding data of original EEPROM and load it. Check whether the displayed mileage is the same as the mileage displayed in odometer.

how-to-use-yanhua-yh35xx-programmer-simulator-13

how-to-use-yanhua-yh35xx-programmer-simulator-14

9. Once the mileage is confirmed, click "Write DATA+ID", Write the original data into the Simulator.
how-to-use-yanhua-yh35xx-programmer-simulator-15

10. Click "Read Data+ID", read the data written into the Simulator, and check the mileage.


how-to-use-yanhua-yh35xx-programmer-simulator-16
11. After the mileage is confirmed, click "Mileage modification" and input the mileage you want.
how-to-use-yanhua-yh35xx-programmer-simulator-17
how-to-use-yanhua-yh35xx-programmer-simulator-18
12. After confirming the input mileage is correct, click "Write DATA+ID" to write the modified data into the Simulator.
how-to-use-yanhua-yh35xx-programmer-simulator-19
13. After the data is written, click "Read DATA+ID" to check whether the mileage modification is correct.
how-to-use-yanhua-yh35xx-programmer-simulator-20
14. If the displayed mileage is the same as what you want, cut off the handle of the Simulator, and solder the Simulator to the original EEPROM position. Pay attention to the EEPROM direction. Install the odometer back to the car to verify whether the mileage modification is successful.

how-to-use-yanhua-yh35xx-programmer-simulator-21